
+965 51122049


Hello. Today we will use Arduino UNO, LCD display and LM35 sensor to measure temperature.
Necessary materials:
The LM35 temperature sensor is an analogue output temperature sensor that performs precise temperature measurement. It has a sensitivity of 0,5 ° C at 25 ° C and it is known to measure the temperature by connecting it to the analogue input of Arduino.
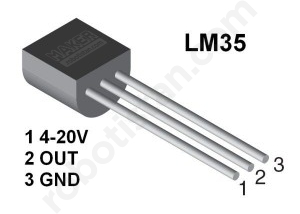
This is the pin configuration of our sensor. It is quite possible to mix this sensor with a TO-92 sheath structure with the transistor, so before we make any connections, let's read it on. This sensor outputs a voltage between 0 and 1V, which is proportional to the temperature from the second leg. If you remember, the Arduino analog inputs were measuring voltages between 0 and 5V unless we specified the axle.
If we leave the analog input range between 0-5V, 80% of the sensor's sensitivity capability will be wasted. To prevent this, we need to calibrate the Arduino analogue measurement from 0 to 1.1V.
First of all, I prescribe the seasons:
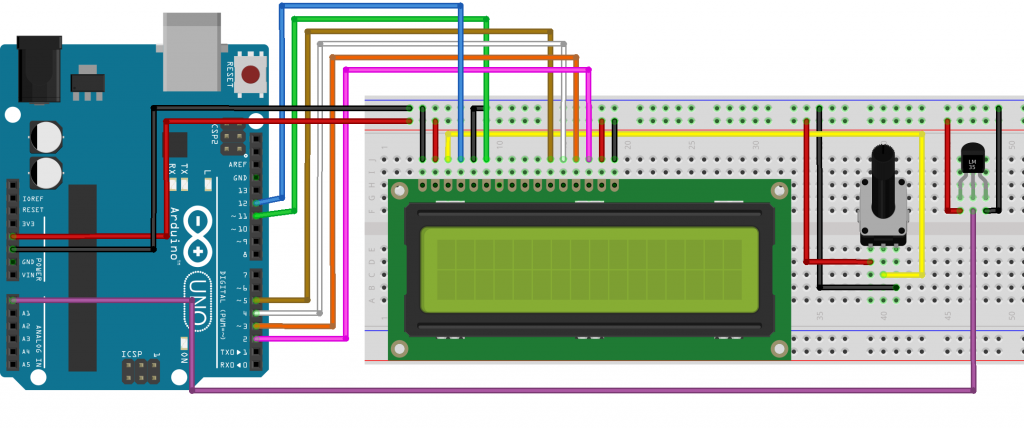 The circuit diagram was updated on 17/01/2017.
Our Code:
  #include <LiquidCrystal.h>


 int lm35Pin = A0;


 LiquidCrystal lcd (12, 11, 5, 4, 3, 2);


 void setup ()


 {


   lcd.begin (16, 2);


   analogReference (INTERNAL);


   lcd.print ("Temperature Count:");


 }


 void loop ()


 {


   int temperatureVolt = analogRead (lm35Pin);


   float temperature C = temperature C = temperature Volt / 9.31;


   lcd.setCursor (0, 1);


   lcd.print (sicaklikc);


   lcd.setcurs is (6,1);


   lcd.print ( " 337C");


   delay (100);


 }
analogReference (INTERNAL) in our setup function; command allows the Arduino analog converter to use a 1.1V reference voltage. At this point, we will read from the analog input 0-1023 values of each step corresponds to 1.0742 mV (millivolt). Since the LM35 corresponds to a temperature of 10 mV, 1 ° C we read in the output of the temperature sensor; 10 / 1.0742 gives us an approximate value of 9.31. This means that if we compare the measured value from the analog input with 9.31, we get the output voltage in degrees centigrade, which is the result of the result sensor.
The command lcd.setCursor (0,1) allows us to print the last character of line 0 of our LCD screen (the first line is assumed to be 0, ie line 1 is the bottom line). Likewise, the temperature value of ##. ## has 5 characters, so we put a 6 degree character in degrees centigrade (° C) in a character space. If the temperature measurement changes very quickly, we can get a more stable value by increasing the time between the parameter and each measurement that the delay () command will take.

In this application, we will check the DC motor speed using a BJT type transistor. Why do we need a transistor...

In this application, we will write text on the LCD screen. In this section, we will first deal with LCD connec...